


Many people are surprised at how simple it is to put up a bell tent. As with most things in life, the first time you pitch a bell tent will take a little patience getting familiar with the engineering behind these amazing canvas tents. Setting up the bell tent after your first go around will only take about 15 minutes – not much longer than a traditional polyester camping tent.
Setting up the Bell Tent
With proper technique, a bell tent will keep the rain out and your roommates cozy. Carefully follow the simple steps below to create a weatherproof shelter that will protect against the elements that mother nature surprise you with.
Just a quick tip to keep the inside of your bell tent dry - tighten the guy lines and zip close the windows and doors!
You can also watch our instructional video:
TOOLS NEEDED TO SETUP A BELL TENT:
-
A hammer
-
A friend (optional but more fun)
Step 1: Select and Prep Your Tent Site
Look for a clear space that is both flat and dry. Try to avoid a location that is clearly in a path that water will drain through - you don’t want to wake up in the center of stream or pond after a rainstorm. Even though trees do provide good shade, it is best to avoid the sap and bird dropping that they tend to drop on the canvas.
Next, give yourself a good clean foundation and clear the location of any sticks and stones where you plan to set-up the bell tent. Fill in any exposed holes so that you and your furniture don’t encounter any booby traps.
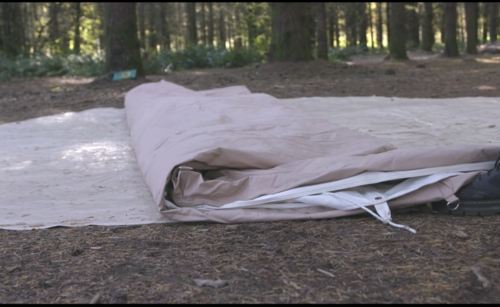
Step 2: Lay down a ground tarp

Most bell tents have a built-in waterproof floor that will keep you dry. However, we highly suggest an added barrier between your canvas tent and the ground to prolong the life of your tent (and speed up the take down process). A bell tent tarp helps to keep excess mud and moisture off the canvas tent – both of which can encourage the growth of mold and mildew. A tarp also helps to more quickly pack up your yurt tent since it significantly reduces any mud and moisture that would need to be cleaned up before folding up your tent. We do sell tarps on our website.
Step 3: Unpack and Unfold the Bell Tent

Carry the bell tent bag to the center of the tarp (if present) and “dump” the tent out. Start unfolding the tent onto the tarp. Keep an eye out for where the tent door is. Arrange the tent entrance so that it is facing the direction that you had envisioned (hopefully with a good view).
Step 4: Peg the Groundsheet Floor

Grab the small metal pegs and your hammer. Start by securing 3 pegs beneath the door into the metal grommets at a 45˚ angle. As you go, pull the bungees over the tent stake (this helps the canvas to cover the zippered groundsheet and keep any rain from seeping in).
Make sure to pull the groundsheet tight as you peg – this helps eliminate wrinkles on the floor inside the tent.
Step 5: Install the Center Pole

Assemble the center pole while outside of the tent. Be sure that the pole has rubber or plastic caps on both ends to avoid ripping the canvas or the tent floor.
Unzip the door and remove your shoes (this keeps your floor clean). Walk into the tent with the “small hoop” end of the pole in front of you (these hoops can be used for hanging items and should be closest to the ceiling).
Find the center cone of the tent roof and marry it with the top end of the pole. Now push & pull the pole upwards so you raise the roof. You may want to “flap” the canvas around you to provide slack, and reduce the tension.
Now maneuver the bottom of the pole to the center of the floor, possibly marked by the “square” at your feet.
Ask a friend to hand you the door poles now.
Step 6: Install the Doors A-Frame Pole

With your shoes still off, assemble the A-frame pole inside of the tent. Place the metal “spike” at the top of the A-frame pole through the matching grommet hole in the canvas above the door. Now move the frame of the poles forward, into the space on either side of the door until it is upright. Secure the pole by placing the feet of the pole into the "pockets" on the floor.
Now step outside and place the plastic rain cap on the top of the spike on the outside of the tent.
Step 7: Stake the Guy Line Ropes

Before proceeding, make sure to zip the bell tent door closed to avoid over tightening the guy lines - thus making it difficult to zip close the door later.
Grab the large metal stakes. Start with the rope above the front door and stake at a 45˚ angle. The guy line ropes should extend straight out and off the tent seams. If the the form of a wall appears to be off, simply move the stake to the left or right a few inches. Now you can move on to the rest of the tent.
Since the walls on our Life inTents™ bell tents are taller than traditional bell tents, you can optionally add the included outer wall support posts to improve the form. Simply insert the wall post into the grommet near the guy line before pegging each guy line.

Wall post used on outside of Life InTents™ bell tents.
The ropes should follow the seam lines of the roof and are ideally staked equidistant from the tent wall.
The desired effect is to have all the guy ropes tight enough to allow the tent to stand upright in a symmetrical position, without any drooping along the walls.
Once all guy lines are staked, tighten all the guy lines with the rope sliders.
Rolling Up The Walls
Some bell tents have a feature that will allow you to unzip the floor and roll up the canvas and/or screen wall to provide a little more breeze and circulation.

To start this process you will want to undo the zipper all the way around the base of the tent.
Next, tightly roll the wall upwards and secure by using the string loops and toggles already attached to inner walls, near where the guy line ropes extend from the bell tent.
How to Pack Up A Bell Tent?
Getting a tent back into its bag has long been a cursed process. Try following these steps to make it easier on yourself. You can also reference our Bell Tent Set Up and Take Down video for a better visual.
Never pack up a tent that is damp or has a dirty floor. If you must, make sure that you dry and clean it within 72 hours before mold and mildew start to grow on the canvas.
Step 1: Sweep the Tent Out

We highly suggest sweeping and drying your bell tent floor before packing up. Any dirt that is left in the tent will become one with the canvas ceiling once you fold up the tent.
Step 2: Remove Guy Line Pegs
Pull out the guy line pegs, wipe them off and return them to their pouch.
Step 3: Remove Inner Poles

Take off your shoes and then remove the A-frame pole, followed by the center pole and immediately return them to their bags (any dirt that collects on your poles will be deposited back in the bell tent the next time you set it up).
Make sure that the canvas walls and roof are not in contact with the dirty or wet ground.
Step 4: Remove Pegs from the Groundsheet
Pull out the remaining pegs from around the groundsheet base of the tent. Wipe them off and return them to their pouch.
Step 5: Fold the Bell Tent Up
A. Fold the tent in half, like a taco. Wipe clean and dry the bottom half of the bell tent (remember what moisture can do to a canvas tent!).
B. Now fold the tent onto itself again so that it is the same width as the tent bag. In order to accomplish this you may need to square off the rounded end of the bell tent. Wipe and dry this section of the tent next.
C. Fold one long side into the middle, onto itself. Do the same with the other long side (this reduced the amount of rolling that happens next. Repeat wiping and drying.
D. Very tightly roll up the tent, continuing to wipe and dry the base as you roll.
E. Grab the bag and slip it over the top of rolled tent (we find this easier than lifting the tent up and placing it into the bag).
F. Add the bell tent poles and pegs to the bag and zip it closed.

Now get back on your road trip!